Tuesday, November 29, 2011

Thanksgiving Weekend

Hi folks, how was your Thanksgiving weekend?  Like the rest of America, I stuffed myself (at Lucille's), shopped (the midnight sale at Macy's) and did some home improvement/decorating.

My most notable project last weekend was painting a 6 foot tall bookcase.  The bookcase lives in my sewing room.  I inherited the bookcase and it is probably from Ikea.  It is laminated wood and the back panel is cardboard.  Here is a "Before" photo.


I used an oil based primer and painted on the first coat on Thursday and the second coat on Friday.  Dad assisted with the painting and was in charge of the shelves.  I painted the bookcase.

Here is an "After" photo after 2 coats.  I also lined the back of the shelf with a shelf liner.


The funny thing is you can hardly find shelf liners anymore.  I shopped at the Home Depot when I picked up my paint and supplies and all they had were plain white, a granite and a dark wood grain pattern.  I also went to the usual places such as Target and finally found 2 rolls of this pink and white polka dot at Big Lots.  Yay for Big Lots even though there were only 2 rolls of this pattern.  Shelf liners must not be a popular item to carry at stores anymore.

Anyway, if I were to do it again, I would trim the liner paper so they wouldn't overlap as it was harder to reposition it when the paper overlaps.  It guess I was a bit lazy and was anxious to put my sewing room back together again.

Here's a couple more "After" photos.

I'm quite happy with the result.  And even if it was probably easier to pick up a new bookcase from Ikea, I'm glad I took the time to repurpose an old eyesore.

Now on to quilting news.  The good news is I completed all the blocks to my Mon Ami quilt.  I started this quilt last October 2010 at a quilt retreat with Verna Mosquera.  It took about a year to complete the applique and embroidery of all the blocks and I am now piecing the rows together and getting it ready for quilting.  I'm not sure at this time if I will be sending it out to be quilted or not.  I have a domestic machine and the thought of quilting this myself is already giving me back spasms. 

Here are a couple of the blocks I completed.


And then, I took creative license and changed one of the blocks from this...

to this...

I will post another picture once I have sewn on the mitered borders.  Hope y'all had a wonderful Thanksgiving like I did.  Gobble gobble.

Thursday, November 17, 2011

My First Tutorial: A Triangular Thread Catcher

When I was in Washington state last month, I bought a couple of these thread catchers at the La Conner quilt museum.  They are very handy for neatnicks like me who need a small receptacle to collect all the loose thread when I applique or do any other hand work.

My friend Hena saw this and being an engineer, figured out how to make one in 30 seconds flat.  After she successfully made herself a sample, she showed me how easy it is to make it so here is my first tutorial.

All you need is 2 pieces of fabric about 12 inch x 12 inch in size.  You can make this any size you want but I tend to like it a little bigger so my fingers can fit inside the hole.

First you draw a 60 degree equilateral triangle.  Each side measures 10 inches.  I made my template on paper so it is easy for me to demonstrate and I can also lay this template on my fabric and rotary cut along side the triangle.


After I cut my 2 pieces of fabric the same size as the triangle, I sewed them right sides together.   Be sure to leave a 4 inch gap on one of the sides so you can turn the triangle inside out.

Once you've turned your triangle inside out, top stitch around the triangle to sew up the gap.


After I topstitch all around the triangle, I use a pin to mark the midpoint between each side.  So referring back to my first photo, you would put a pin midpoint between A and B, B and C and A and C.

 
Then I fold each triangle peak down and pin it as well, making sure that the triangle peaks do not go lower than my midpoint pins.

Then I take one side of the triangle, fold them together and topstitch the sides.  Be careful not to stitch down the triangle peaks.  Make sure to backstitch at the beginning and end to ensure that the sides are securely sewn together.


Take the other 2 sides and do the same.  The result will look like this.


Secure the triangle ears down with a button and you are all done.  Ta Da!!!


Thanks to my friend Hena for figuring out this little contraption.  Hope you enjoyed this tutorial and if you do make one of these threadcatchers, please send me a photo.


Saturday, November 12, 2011

Nancy's President's Quilt

Every year, the outgoing president of Beach Cities Quilt Guild receives a quilt from all the members as a "Thank You" for all her hard work.  Each of these quilts are truly a work of art and it is customized to fit a theme and color scheme per the request of the outgoing president.

My friend Nancy wanted a quilt which captures all of her favorite things.  Nancy enjoys baking, wine, quilting (obviously), cross stitch, snowmen, Hummel figurines and bird houses.  So each member of the guild was requested to contribute a block which fit the theme.  The blocks submitted were 5.5 x 5.5  inches and a very talented pool of designers put all the blocks together and a quilting bee is organized so everyone can hand quilt this project.  I am truly impressed with all the talent in our guild.

And here is the big reveal.  Isn't it gorgeous?


Here are a few close up shots of the quilt.


Each member did something different.  Some did hand embroidery, a few did machine embroidery, a few appliqued blocks and it would really take time to examine and appreciate each and every block. I want to apologize in advance if I don't give credit to every individual whose blocks are featured or included on this blog.


And here's the block I contributed.  It represents Nancy's grandson Kyle, which I'm pretty sure is one of her favorite things!


Congratulations Nancy and thank you for your leadership at BCQG.


Friday, November 11, 2011

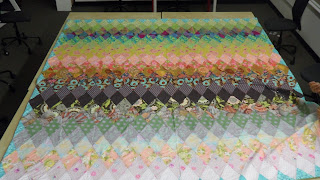
A Field of Flowers

Hena is one of the gals who works at Sewing Party with me and she stopped by the store last Sunday to baste a quilt for a friend. 


This is her friend's VERY FIRST quilting project and it is a king size quilt for her daughter and son-in-law.  Pretty ambitious project but she did a very good job. 


The setting is a row of diamond shaped blocks and from a distance, it sure looks like a field of flowers.  I don't think my photographs really capture the beauty of this quilt because it is quite difficult to take a photo of a king size quilt laid out on a table, even if you are standing on a table to get some distance. 


Monday, November 7, 2011

Applique Quilts to Show and Tell

Fall has arrived in Southern California.  It was raining pretty hard this morning and the temperature is in the 50s.  Here is the fall display at Piecemakers.  I dropped by the store during my lunch hour a couple weeks ago to get some Steam a Seam and they were having a pictorial at the store.  There were some people from Patchwork Tsushin magazine and the store will be featured in a future edition.  Hmm, doesn't it sound like a fun job to travel the world visiting quilt stores to feature in a magazine?


Last week, my friend Jennifer showed me a quilt which her friendship group made for one of their members who is celebrating a birthday. Her friend wants a tropical themed quilt and each member made some blocks for this quilt. Jennifer designed the quilt setting and appliqued all the flowers.


Don't you just love the colors of this quilt?  The entire quilt is made of Batik fabrics and some of the pieces were tropical prints, as well.


Jennifer did the quilting herself on her domestic sewing machine.  Now, this is a large quilt.  I would guess the size is about 70 x 70 so for Jennifer to do intricate quilting, including feathers, on this quilt is amazing.  Check out some of the quilting details.


Jennifer is not only a talented quilter, she is also known for her applique work.  In fact, she is teaching a class at Sewing Party starting this month and here's block one of the project.


This block of the month project is called Raining Cats and Dogs and it is designed by Bunny Hill Designs.  You can check out what the entire project will look like on Bunny Hills' website.  The program will meet once a month and Jennifer will teach her method of doing needle turn applique.  Kits will be available and the fabrics are from Moda's Etchings and Puttin on the Ritz line.  The color range is in light pink, grey, blue and creme. 

In fact, today I spent the day making kits for this project.  Here is a preview of some of the fabrics.  It is going to be fabulous!


Don't miss the chance to take Jennifer's class.  Here she is with her beautiful tropical quilt.


I also worked on an applique block this past week.  This flower cart has 45 pieces.  This project is from a quilt pattern called "Mon Ami".  The quilt is designed by Verna Mosquera and I took her applique retreat last October in Danville.  There are 22 blocks total and I am down to the last 3.  I can't wait to finish this quilt.