Monday, March 24, 2014

Are You an Innie or an Outie?

So apparently, when it comes to using yarn, there are those who pull the end of the yarn from the top of the skein - what I'd call an Outie.


And those who pull the end of the yarn from the inside of the skein- what I'd call an Innie.


Before this turns into the great over or under  toilet paper debate, I will stay on neutral ground and say that either method is correct.  The advantage of using yarn from the outside is that the end is definitely easier to find.  The disadvantage is that when you pull on the thread, there is a tendency for the skein to roll off and travel across the room.

Using the yarn from the inside is a bit trickier because you have to stick your fingers in and find the little ball where the end is tucked.  It's sort of like taking out the bag of turkey giblets stuffed inside the bird.  But the advantage is the outside stays neat and you can keep the yarn label on.

At any rate, I was inspired to start a new crochet project and my colors were inspired from this swatch of fabric from Lecien.  I think it's from the Flower Sugar collection.  Love, love, love!


So, here's the yarn I gathered together.  They're from Michael's and Hobby Lobby. Don't you agree they're yum, yum, yum?


I couldn't wait to get started and I chose to go with an easy Granny Stripe pattern.  You can find the pattern here.  I love Lucy of Attic 24!  

Here is what I've made so far.  I can't wait to finish this.  


Speaking of finishing things, I'm almost done quilting my Abundance quilt.  Will post photos soon!

Wednesday, December 25, 2013

A New Winter Scarf for Me!

After I completed dad's scarf, I made one for myself in a bright, cheery, holiday red.  This is a free pattern from Red Heart designed by Kimberly McAlindin.  You can find the pattern here


Here's the photo from Red Heart's website.  I liked the way it goes over her shoulder so next time I will make mine using a larger hook.

LW2286 Shimmer Cowl

I did use Red Heart's Shimmer yarn in red.  Took up 1.5 skeins.  (Available at Joann)  Love the feel of the yarn. Personally, I found the pattern difficult to understand.  But, largely because I am a beginner.  I just started learning how to crochet this summer and all I've really made are scarves and hats.  I got the measurements pretty close to what the pattern indicates.  However, I didn't get the top part as narrow as the pattern's.  I guess I could have done more decreases for a more narrow opening.  But, I didn't want to lose the scallop pattern on the top edge.  It was too complicated for me to figure out.

I wore this last Friday to a Christmas party with a black shirt underneath and a black blazer. Glad I was able to wear it before the 81 degree heatwave we had in Southern California on Christmas Day.

Hope y'all had a wonderful holiday!  

Thursday, December 12, 2013

New Winter Scarf for Dad

Over the summer, I learned how to crochet and I've been working on a few hats and scarves for this winter.  Dad wanted a  white scarf but definitely not in wool (because of the itch factor). So, I found this interesting scarf on Ravelry and made it with Red Heart Soft Baby Steps yarn in White.


The pattern itself is not difficult but it can get confusing because you are starting with a front post double crochet and back post double crochet alternating in every other row.  So, you definitely need to  keep track of which row you are on to ensure that the basket weave pattern is correct.  A bit time consuming but the pattern is really unique- not something you can just buy off the shelf.

The scarf ended up to be quite thick, soft and cozy.  You can find a tutorial on the basket weave stitch here.  The blog even has a video so you can follow along.  I used up about 2 1/2 skeins and made 166 rows.

And here is dad modeling his new scarf.

Monday, December 2, 2013

Taking a Stroll Down Sonya's Garden

Wow!  It's been over 2 months since my last blog entry.  Anyone still out there?  If you are, thanks for your patience or indifference, whichever the case may be :-)

So, I took a mini break and flew to the Philippines for a 2 week vacation.  Nothing crafty to report.  The Philippines isn't a big crafting mecca (unlike Japan or Korea) but don't feel too sorry for me.  I ate so much and had spa treatments and even had some time to work a little bit on my Redwork.

But, I wanted to share some photos of my travels. It is called Sonya's Garden and it is a restaurant/ bed and breakfast/day spa located about 1 1/2 hours outside of Manila.  

The restaurant serves a buffet (one set menu daily) highlighting the vegetables grown in the premises.


Some of the beautiful china.


It is a tranquil (no unruly children allowed) and calm oasis where you can get away and just unwind, enjoy a spa treatment,  maybe do some embroidery or learn the art of doing absolutely nothing!


Sonia's Garden reminds me of life around the turn of the century- when people ate foods from their garden served on fine china, take siestas outdoors under a canopy or shady tree, play cards or do some embroidery and listen to the vitrola record player at dusk and enjoy a sangria and dance an the evening lit by fireflies, candles and the moonlight.

If a picture paints a thousand words, then I will just allow them to do all the talking.  

Here are a few of the daybeds located around the garden for a quick nap or Tete-a-tete.


Here's one of the little cabins for overnight visitors.  Sliding windows are made of Capiz (windowpane oyster) shells.


Back in Manila, I spied a kalesa (horse drawn carriage) in the old district of Manila.  When I was little, my mom and I would take a kalesa ride from my dad's office in the textile district called Divisoria to Chinatown for lunch and a movie.  

You could fit 2 adults in the carriage.  The little seat upfront is for the kutsero or driver.  Some of the kalesas are brightly and beautifully decorated and they definitely all have a waste sack so the horse does not leave a mess around the streets.  Not a lot of kalesas are around anymore.  Like any big city, people are in a rush and riding a horse carriage isn't the most time efficient.  


Friday, September 6, 2013

Just Staring Into Space

I started machine quilting my Abundance quilt.  But I ran out of thread.

So, I decided to work on my Kaffe Fassett Bordered Diamonds quilt- which has been on my design wall for almost a year now.  I have sewn some of the borders on the diamond blocks. But, I'm still not satisfied.


I'm second guessing my fabric selection.  I'm  over analyzing my fabric placement.  I'm obsessing over this quilt and I feel like I'm stuck in quicksand...immobilized and slowly sinking.

But then again, I think it's the damn heat!  How can it be a humid 100 degrees?  No wonder I'm just staring into space.


Oh, and yes.  I realize my car interior is very dusty.  But if I I think it is too hot and miserable to quilt, then it is definitely too hot and miserable to clean.

Thursday, August 15, 2013

Criss Cross Pretty Rose

Just finished this free little project from Cross Stitcher magazine.  


Have a great Thursday everyone!

Saturday, August 10, 2013

I Plead Temporary Insanity

Last time, I hinted that I took on an extra large project (aka I bit off more than I could chew).  I either overestimated my abilities and time to work on something or I was temporarily insane.  I think I will pick the latter.  

So, it all started when I became obsessed with Pinterest.  I saw this pillow designed by Eline Pellinkhof and I just had to make it.
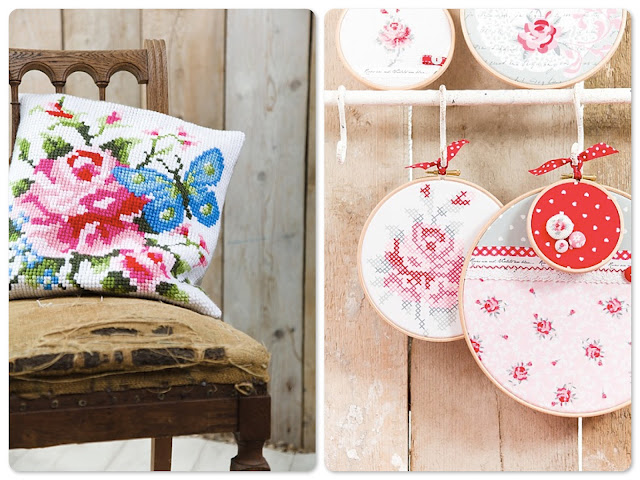


It is from her first book "Sitch and Sew Home".


Well, come to find out that the pattern is for a needlepoint project.  I was not about to take on needlepoint because I did not want to hunt around for yarn. Yes, I'm sure I can find yarn in all sorts of delicious colors but seriously, I just did not want to make an investment.  

So, Plan B.  Perhaps I can adapt it to a cross stitch project instead.  After all, I already own a boatload of floss and at $0.40 a skein, I think that's more affordable.  

The chart is approximately 80 x 80 so using a 14 count Aida cloth, the finished project would be only a 5.75 inch square.  Sooo...I thought, what if I supersized it? Using an 11 count Aida cloth and doubling up the stitches (ratio would be 1:4), I could make this about 14.5 inch square.  That's more like it.


So, that's when insanity hit.  Just think about it.  For every cross stitch on the chart, I had to make 4!  Plus, this is my first "big" cross stitch project.  The only other cross stitching experience I had were those little 3.5 inch snow flakes.  


However, the pattern isn't really complicated and it's not like there are 25 different colored floss to use.  Plus, using an 11 count Aida also meant the squares were pretty big.


So, let's go big or go home!


As I worked on this project, it became obvious that if I did not stitch on every square of the fabric, the holes from the Aida cloth would show through and it would look ugly.  Translation, I would have to stitch on the background of the design, as well.  Was not looking forward to that.


I did not even log the hours I put onto this project.  Let's just say it took about 5 months to complete.  Next, I had to wash it.  I should have taken photos but it didn't dawn on me until I was done.

I searched the internet and after much research, I used the following products.


Since I used a lot of white thread, I wanted it sparkling clean.  I was also really concerned about the red floss bleeding.  DMC floss is colorfast but I wasn't going to take a chance so I used a sheet of Shout Color Catcher when I hand washed it in Tide.

Still not satisfied, I washed it again in Tide and added OxiClean and the Shout Color Catcher.  My own cross stitch cleaning cocktail.  After I rinsed it and dried it flat, i then pressed it (face down) on a clean towel.  

Now that it was sparkling clean, I couldn't bear using it as a pillow.  I definitely did not want to get it dirty and have to wash it a lot.

So, I decided to get it framed and voila!  Here it is.


I splurged and had it professionally stretched and framed and the mat is silk. But I put in so much time and effort into this and I have no doubt that it would have taken me months to do a haphazard job of framing it myself.

I am so impressed with the framer that I would highly recommend On the Wall Framing in Santa Ana.  They were quick and did an awesome job.  The only thing I didn't splurge on was the non-glare museum glass.  But, I could always change the glass later if I really wanted it.  I am really happy with the way it turned out and now, I can't wait to start on another cross stitch project.

Here it is in my sewing room.  It is sitting right above my ironing board.